よーわからん。複数出すのが最終目標だけどそもそも単品すら出ないからまとめ
- 説明はしょるところ
- 必要なもの
- STEP1:タスクの実行環境を作る
- STEP2:アプリケーション、ログのコンテナイメージを作る
- STEP3:タスク定義を作る
- STEP4:タスクを実行する
- STEP5: ログを確認する
- 途中困って解決したやつ
説明はしょるところ
大方端折るけど、大体以下は知っている前提
必要なもの
ゼロから作るの面倒。大きく5STEPぐらいで。
- STEP1:タスクの実行環境を作る
- STEP2:アプリケーション、ログのコンテナイメージを作る
- STEP3:タスク定義を作る
- STEP4:タスクを実行する
- STEP5:ログを確認する
STEP1:タスクの実行環境を作る
コンテナの実行環境(ECS Fagete)が動く環境を作る。
動く環境を作るのもそこそこ面倒。以下のリソースが最低限いる。
環境整えるのに最低これぐらいいる。面倒。
CloudFormationにパクパクさせよう。
AWSTemplateFormatVersion: "2010-09-09"
Description: "ECS Task Working Environment with VPC, ECS Cluster, Subnets, Endpoints, and ECR without IGW"

Parameters:
  VPCName:
    Description: "The name of the VPC"
    Type: String
    Default: "ECSVPC"

  ClusterName:
    Description: "The name of the ECS Cluster"
    Type: String
    Default: "ECSCluster"

  ECRRepositoryName:
    Description: "The name of the ECR Repository"
    Type: String
    Default: "ecs-ecr-repo"

  PrivateSubnet1CIDR:
    Description: "The CIDR block for the private subnet"
    Type: String
    Default: "10.0.1.0/24"

Resources:
  # VPC
  VPC:
    Type: "AWS::EC2::VPC"
    Properties:
      CidrBlock: "10.0.0.0/16"
      EnableDnsSupport: true
      EnableDnsHostnames: true
      Tags:
        - Key: "Name"
          Value: !Ref VPCName

  # Private Subnet
  PrivateSubnet1:
    Type: "AWS::EC2::Subnet"
    Properties:
      VpcId: !Ref VPC
      CidrBlock: !Ref PrivateSubnet1CIDR
      AvailabilityZone: !Select [0, !GetAZs ""]
      MapPublicIpOnLaunch: false
      Tags:
        - Key: "Name"
          Value: "PrivateSubnet1"

  # ECR Repository
  ECRRepository:
    Type: "AWS::ECR::Repository"
    Properties:
      RepositoryName: !Ref ECRRepositoryName

  # ECS Cluster
  ECSCluster:
    Type: "AWS::ECS::Cluster"
    Properties:
      ClusterName: !Ref ClusterName

  # VPC Endpoints for ECR
  VPCEndpointECR:
    Type: "AWS::EC2::VPCEndpoint"
    Properties:
      VpcId: !Ref VPC
      ServiceName: !Sub "com.amazonaws.${AWS::Region}.ecr.api"
      VpcEndpointType: Interface
      PrivateDnsEnabled: true
      SubnetIds:
        - !Ref PrivateSubnet1
      SecurityGroupIds:
        - !Ref SecurityGroup
      Tags:
        - Key: "Name"
          Value: "for-ecs-cluseter-ecr-api-endpoint"

  VPCEndpointECRDkr:
    Type: "AWS::EC2::VPCEndpoint"
    Properties:
      VpcId: !Ref VPC
      ServiceName: !Sub "com.amazonaws.${AWS::Region}.ecr.dkr"
      VpcEndpointType: Interface
      PrivateDnsEnabled: true
      SubnetIds:
        - !Ref PrivateSubnet1
      SecurityGroupIds:
        - !Ref SecurityGroup
      Tags:
        - Key: "Name"
          Value: "for-ecs-cluseter-ecr-dkr-endpoint"

  # VPC Endpoint for S3 (Gateway Endpoint)
  VPCEndpointS3:
    Type: "AWS::EC2::VPCEndpoint"
    Properties:
      VpcId: !Ref VPC
      RouteTableIds:
        - !Ref PrivateRouteTable
      ServiceName: !Sub "com.amazonaws.${AWS::Region}.s3"
      VpcEndpointType: Gateway
      Tags:
        - Key: "Name"
          Value: "for-ecs-cluseter-s3-endpoint"

  # VPC Endpoint for CloudWatch Logs (Interface Endpoint)
  VPCEndpointCloudWatchLogs:
    Type: "AWS::EC2::VPCEndpoint"
    Properties:
      VpcId: !Ref VPC
      ServiceName: !Sub "com.amazonaws.${AWS::Region}.logs"
      VpcEndpointType: Interface
      PrivateDnsEnabled: true
      SubnetIds:
        - !Ref PrivateSubnet1
      SecurityGroupIds:
        - !Ref SecurityGroup
      Tags:
        - Key: "Name"
          Value: "for-ecs-cluseter-logs-endpoint"
  # Security Group
  SecurityGroup:
    Type: "AWS::EC2::SecurityGroup"
    Properties:
      GroupDescription: "Allow all inbound and outbound traffic"
      VpcId: !Ref VPC
      SecurityGroupIngress:
        - IpProtocol: -1
          CidrIp: "0.0.0.0/0"
      SecurityGroupEgress:
        - IpProtocol: -1
          CidrIp: "0.0.0.0/0"
      Tags:
        - Key: "Name"
          Value: "ECS-SecurityGroup"

  # Route Table for Private Subnet
  PrivateRouteTable:
    Type: "AWS::EC2::RouteTable"
    Properties:
      VpcId: !Ref VPC
      Tags:
        - Key: "Name"
          Value: "PrivateRouteTable"

  PrivateSubnetRouteTableAssociation:
    Type: "AWS::EC2::SubnetRouteTableAssociation"
    Properties:
      SubnetId: !Ref PrivateSubnet1
      RouteTableId: !Ref PrivateRouteTable

Outputs:
  VPCId:
    Description: "The ID of the created VPC"
    Value: !Ref VPC

  SubnetId:
    Description: "The ID of the created private subnet"
    Value: !Ref PrivateSubnet1

  ECSClusterName:
    Description: "The name of the ECS Cluster"
    Value: !Ref ECSCluster

  ECRRepositoryURL:
    Description: "The URL of the ECR Repository"
    Value: !GetAtt ECRRepository.RepositoryUri
STEP2:アプリケーション、ログのコンテナイメージを作る
動作確認用のコンテナイメージをECRに登録する
もうあればいいけど用意不要。
ちょっと試そうと思ってるだけなのにコンテナイメージが2つもいる。
以下3ファイルをCloudShellにアップロードして、シェル実行すれば上で作ったECRにイメージが登録される。
※Windowsの場合は改行コードにきをつけて。LFじゃないと暴れるよ。
※Dockerfileの名前に気を付けて。決め打ちしてるから。
※chmodでシェルに実行権限与えないとうごかない。
- 適当なWEBアプリ。Dockerfile.flask
標準出力に何かはかないとまともにログが取れない(らしい)ので標準出力に何か吐いてさえいればよい。
# ベースイメージとしてPythonを使用
FROM python:3.9-slim

# Flaskをインストール
RUN pip install flask

# FlaskアプリケーションのコードをDockerfile内で直接埋め込む
RUN echo "\
from flask import Flask\n\
import logging\n\
import sys\n\
\n\
app = Flask(__name__)\n\
\n\
# ロギングの設定(標準出力に出力)\n\
app.logger.setLevel(logging.INFO)  # ログレベルをINFOに設定\n\
handler = logging.StreamHandler(sys.stdout)\n\
handler.setLevel(logging.INFO)\n\
formatter = logging.Formatter('%(asctime)s - %(name)s - %(levelname)s - %(message)s')\n\
handler.setFormatter(formatter)\n\
app.logger.addHandler(handler)\n\
\n\
# Werkzeugのロガーも設定\n\
werkzeug_logger = logging.getLogger('werkzeug')\n\
werkzeug_logger.setLevel(logging.INFO)\n\
werkzeug_logger.addHandler(handler)\n\
\n\
@app.route('/')\n\
def hello():\n\
    app.logger.info('Hello, World! accessed')\n\
    return 'Hello, World!'\n\
\n\
@app.route('/test')\n\
def test():\n\
    app.logger.info('Test endpoint accessed')\n\
    return 'This is a test endpoint'\n\
\n\
if __name__ == '__main__':\n\
    app.run(host='0.0.0.0', port=80)\n\
" > /app.py

# ポート80を開放
EXPOSE 80

# Flaskアプリケーションを実行
CMD ["python", "/app.py"]
" > /app.py

# ポート80を開放
EXPOSE 80

# Flaskアプリケーションを実行
CMD ["python", "/app.py"]
- 適当設定のFluent。Dockerfile.fluent
# Use Fluent Bit as the base image
FROM amazon/aws-for-fluent-bit:latest

# Create the fluent-bit.conf file directly in the Dockerfile without the INPUT section
RUN echo '[SERVICE] \
    Flush        1 \
    Daemon       Off \
    Log_Level    info \
[OUTPUT] \
    Name cloudwatch_logs \
    Match * \
    region ap-northeast-1 \
    log_group_name fluent-bit-log-group \
    log_stream_prefix from-fluent-bit- \
    auto_create_group true' > /fluent-bit/etc/fluent-bit2.conf
- イメージの登録用シェル
#!/bin/bash
############
# $1:account id
############

if [ -z "$1" ]; then
    echo "Error: Please specify the first argument as the account ID."
    exit 1
fi

aws ecr create-repository --repository-name ecs-webapp
aws ecr create-repository --repository-name ecs-fluentbit

aws ecr get-login-password --region ap-northeast-1 | docker login --username AWS --password-stdin "$1.dkr.ecr.ap-northeast-1.amazonaws.com"

docker build -t ecs-webapp -f Dockerfile.flast.
docker build -t ecs-fluentbit -f Dockerfile.fluentbit .

docker tag ecs-webapp:latest "$1.dkr.ecr.ap-northeast-1.amazonaws.com/ecs-webapp:latest"
docker tag ecs-fluentbit:latest "$1.dkr.ecr.ap-northeast-1.amazonaws.com/ecs-fluentbit:latest"

docker push "$1.dkr.ecr.ap-northeast-1.amazonaws.com/ecs-webapp:latest"
docker push "$1.dkr.ecr.ap-northeast-1.amazonaws.com/ecs-fluentbit:latest"
うまくいってたらこんな感じでECRにイメージが登録される

STEP3:タスク定義を作る
STEP2のイメージを使うようにタスクを定義を作る。
※差し替えが手間だからやってないが。:latestがURIから抜けてる。ECRからちゃんとイメージとれないので注意
とりあえずコンソールからGUIで作ったけど、途中どうしてもJSON直接編集しないといけなかったら一回つくってJSONしました。
ここが一番困りました。いろんな記事があって正解どれやねん状態になってきつかった。


これでうまくいけばいいけど。設定ファイルの差し込みがいるらしい。これもGUIでやれればいいけどできないっぽい。
docs.aws.amazon.com
ので、Jsonをいじります。

 ]
]
これでタスク定義は完了。
参考までにJSON全体もおいておく。
自分の環境に読み替えが発生するところがあるので、
上の手順とGUIを照らし合わせたほうが、手順はわかりやすい。
※AccountIDとか、イメージ別のもの使ってたりしたら差し替えがいります。
{
    "family": "tekitou",
    "containerDefinitions": [
        {
            "name": "web-app",
            "image": "[AWS::AccountId].dkr.ecr.ap-northeast-1.amazonaws.com/ecs-webapp:latest",
            "cpu": 512,
            "portMappings": [
                {
                    "name": "80",
                    "containerPort": 80,
                    "hostPort": 80,
                    "protocol": "tcp",
                    "appProtocol": "http"
                }
            ],
            "essential": true,
            "environment": [],
            "mountPoints": [],
            "volumesFrom": [],
            "startTimeout": 10,
            "logConfiguration": {
                "logDriver": "awsfirelens",
                "options": {}
            },
            "systemControls": []
        },
        {
            "name": "log_router",
            "image": "[AWS::AccountId].dkr.ecr.ap-northeast-1.amazonaws.com/ecs-fluentbit:latest",
            "cpu": 0,
            "memoryReservation": 51,
            "portMappings": [],
            "essential": true,
            "environment": [],
            "mountPoints": [],
            "volumesFrom": [],
            "user": "0",
            "logConfiguration": {
                "logDriver": "awslogs",
                "options": {
                    "awslogs-group": "/ecs/ecs-aws-firelens-sidecar-container",
                    "mode": "non-blocking",
                    "awslogs-create-group": "true",
                    "max-buffer-size": "25m",
                    "awslogs-region": "ap-northeast-1",
                    "awslogs-stream-prefix": "firelens"
                }
            },
            "systemControls": [],
            "firelensConfiguration": {
                "type": "fluentbit",
                "options": {
                    "config-file-type": "file",
                    "config-file-value": "/fluent-bit/etc/fluent-bit2.conf"
                }
            }
        }
    ],
    "taskRoleArn": "arn:aws:iam::[AWS::AccountId]:role/ecsTaskExecutionRole",
    "executionRoleArn": "arn:aws:iam::[AWS::AccountId]:role/ecsTaskExecutionRole",
    "networkMode": "awsvpc",
    "requiresCompatibilities": [
        "FARGATE"
    ],
    "cpu": "1024",
    "memory": "3072",
    "runtimePlatform": {
        "cpuArchitecture": "X86_64",
        "operatingSystemFamily": "LINUX"
    }
}
STEP4:タスクを実行する
STEP1で作った環境にSTEP3で作ったタスク定義からタスクを作ります。


ここまではデフォルトでOK
ネットワーク設定はSTEP1で作った環境をつかおう。SGはがばがばだからがばがばで。

タスクがRunningになればOK

STEP5: ログを確認する
うまくいってるとサイドカー側のコンテナログにこんな感じでる。
![]()

設定ファイルがおかしいとこんな感じのログが出る。

そもそもだめだとコンテナの起動ログしかでない。この辺で切り分ける。
設定ファイルで指定したほうもでてる。
![]()
とりあえず出た。おわり。
途中困って解決したやつ
- ECRのURI間違えてた。
タスク起動時にECRにアクセスできずにタスクがずっとこけてた。よくみたらURI間違ってた(タグ指定してなかった)
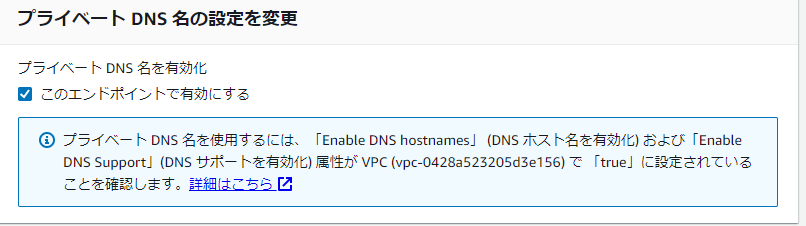
- Endpointの設定間違えてた。
ECRにアクセスできない事象の原因2つめ。エンドポイントのPrivate DNSの名前解決を有効にしてなかった。
- Fluent-bitの設定箇所にログがでてくれない
原因がよくわかってない。
「設定ファイルをDockerfileでインライン記述していたのを直してちゃんと改行するようにした」
とか
「[INPUT]セクションとか、ネットの記事をそのままパクッてきたので意味わかってない記述を排除した」
とかそのあたりが原因だったと思われる。シンプルな構成にしたらなんかちゃんと動くようになった。
- 吐いたはずのアプリログがでておらんかった。
Flastのログレベルが標準だとWARNINGなのでそのせいらしい。Dockerfile調整してなおった。
なんかログはでてたけどこんな感じで


たとえばflaskでは
app.logger.info('Hello, World! accessed')\n\
としてるのでこれがでてほしいのだけれど、でとらんかった。